
PulsePoint
Learn how to connect and send audiences to PulsePoint
In this article, we'll guide you through connecting PulsePoint to GrowthLoop and exporting your audiences to the destination.
PulsePoint, a leading programmatic platform, specializes in health data and real-time ad targeting, making it a powerful tool for reaching highly specific audiences in the healthcare sector.
Prerequisites
- Make sure you have a PulsePoint account. If you don't, fill out this form to get in touch with a rep!
- Make sure you have your API credentials handy, including
Client ID,Client Secret, andAccount ID. If you don't have them, please contact your rep!
Note
PulsePoint lists cannot exceed 1 million unique NPIs. GrowthLoop automatically dedupes before each export, but exports larger than this must be split into separate audiences or reduced to avoid export errors.
Set up destination
-
Log into GrowthLoop and click the Destinations tab on the left sidebar.
-
Then click New Destinations on the upper right side.
-
Next, search for PulsePoint in the destination modal and click Add PulsePoint.
-
Enter the required information in the modal, then click Create.
Destination: Enter the name you want to give the destination.Sync Frequency: Select a default export frequency to the destination.Advertiser: Enter the name of the advertiser you're uploading NPI lists to.Username: Enter your sign-in email.Password: Enter your sign-in password.Account ID: Enter the Account ID provided by your rep.Client ID: Enter the Client ID provided by your rep.Client Secret: Enter the Client Secret provided by your rep.
Export to destination
- Navigate to your list of audiences by clicking the Audiences tab on the left sidebar.
- Choose an existing audience or create a new one. Need help creating? Click here to learn how!
- Once created, click the Export button on the upper right side.
- Search for PulsePoint in the export modal and then click Add PulsePoint.
- Please map the column containing NPIs to the
NPIs (Required)field under Configure Match Field Settings, then click Next. - Configure your export settings:
- Export Name: Automatically populated with your audience name for easy identification in the destination.
- Campaign Type: Choose between a one-time export or ongoing basis.
- List Status: Choose between New or Existing.
New: Selected by default, this option will create a new NPI list, using the audience name as the list name, and export NPI records to it.Existing: This option will export NPI records to the specific NPI list you select using its List ID. To find the List ID, navigate to the Campaign NPI Lists section in PulsePoint and click on the desired list. The List ID is the last part of the URL (e.g., https://platform.pulsepoint.com/Buyer/#/setup/npilist/123456).
- Advertiser (Required): The advertiser name will automatically populate based on your input when creating the destination. You can change it if you wish!
- PulsePoint Product (Required): Specify the product within PulsePoint to which you would like to upload NPI lists. Currently, we only support
LIFE. - Export Schedule: Set the frequency, start date, end date, and specific days of the week.
- Additional Fields: Add additional fields you would like to append to your NPI list. Please note:
- You can't add more than 35 additional fields to your NPI list.
- If you set the "Campaign Type" to "Ongoing" and include additional fields (i.e. attributes), newly added audience members since the last export will override the previous list. For example, if your first export contains 10 NPIs and the next export includes only 2, the entire NPI list will now only contain the 2.
- Finally, click Export to send the audience to PulsePoint!
SuccessYou have successfully exported the audience!
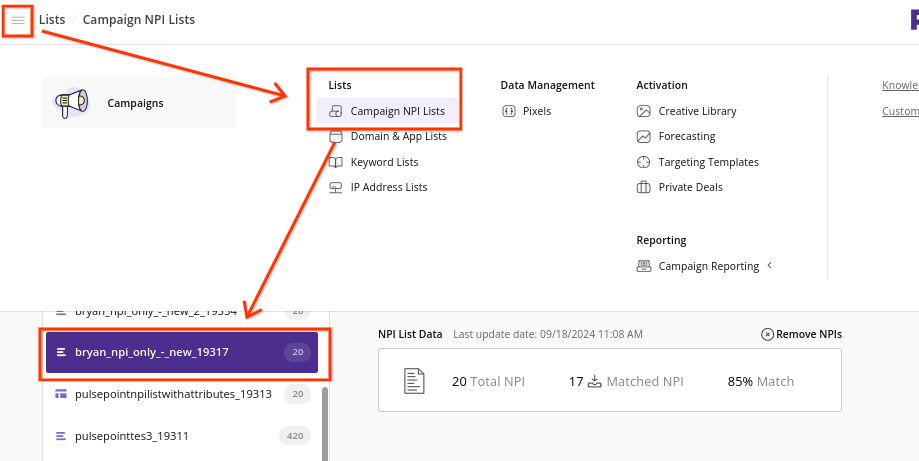
To view your list, log in to your PulsePoint account, click the hamburger menu on the left-hand side, and select Campaign NPI Lists under Lists.
NoteExperiencing any issues when connecting and/or exporting to PulsePoint? Reach out to us at [email protected] and we’ll be in touch shortly to help resolve the matter!
Updated 10 months ago