Export Storage: Bring your own Bucket
Learn how to leverage your own storage buckets for exports.
The GrowthLoop platform stores some data in storage buckets to route data to the marketing platform or power other features like debug logs. Your team has control over whether you choose to use a GrowthLoop-managed storage bucket or bring your bucket (BYOB).
What data is stored?
GrowthLoop only temporarily stages audience or segment membership into a staging storage bucket to allow our export service to sync the members to various marketing platforms. After routing this data is deleted, and these buckets also have a TTL of 7 days.
Bring your own bucket
Your team can decide to store all at-rest data in a private bucket managed within your own GCP/AWS infrastructure. Currently, we support both:
- S3 (AWS)
- Google Cloud Storage (GCS)
Amazon S3
To setup S3 as your storage bucket follow these steps:
-
Create a new S3 bucket in your AWS account
- Make sure to block public access
- Setup a TTL time of your choice to enhance security
-
Create a new IAM Policy to give permissions to bucket.
- In AWS, select IAM
- Select Policies
- Select Create Policy
- For policy editor, select JSON
- Copy and paste the text below into the policy editor.
{ "Version": "2012-10-17", "Statement": [ { "Effect": "Allow", "Action": [ "s3:PutObject", "s3:GetObject", "s3:GetObjectVersion" ], "Resource": "arn:aws:s3:::byob-docs-test/exports/*" }, { "Effect": "Allow", "Action": [ "s3:ListBucket", "s3:GetBucketLocation" ], "Resource": "arn:aws:s3:::<bucket>", "Condition": { "StringLike": { "s3:prefix": [ "exports/*" ] } } } ] }- These are the permissions you are providing in this policy.
Permission Details s3:PutObject Permission to unload files to bucket s3:GetObject Permission to retrieve objects s3:GetObjectVersion Permission to access a specific version of an object s3:ListBucket Permission to list some or all objects s3:GetBucketLocation Permission to retrieve region bucket is in - Enter a policy name and click Create Policy.
- Assign your new IAM Policy to your GrowthLoop IAM user.
-
Create an IAM role in AWS.
- Select IAM in Management Console
- Select Roles
- Select Create Role
- Select AWS account and leave "This Account" selected for now
- Also ensure require external ID is selected and enter placeholder 0000
- Enter Role details and select Policy created above.
- Enter Role Name and Description and select Create Role
You have now created an IAM policy for a bucket, created an IAM role, and attached the policy to the role.
On the role summary page, locate and record the Role ARN value.
-
Additional Steps For Snowflake Integration:
-
Create Storage Integration in Snowflake. A storage integration is a Snowflake object that stores a generated identity and access management (IAM) user for your S3 cloud storage, along with an optional set of allowed or blocked storage locations (i.e. buckets).
- Run the following SQL Command in Snowflake:
USE ROLE ACCOUNTADMIN; create storage integration FLYWHEEL_APP_AWS type = external_stage storage_provider = 'S3' enabled = true storage_AWS_role_arn = '<iam_role>' storage_allowed_locations = ('s3://<bucket>/exports/'); GRANT USAGE ON integration FLYWHEEL_APP_AWS to ROLE <growthloop_role>;- Where:
- iam_role is the Amazon Resource Name (ARN) of the IAM role you created above.
- bucket is the name of a S3 bucket that stores your data files (e.g. mybucket). The required STORAGE_ALLOWED_LOCATIONS parameter and optional STORAGE_BLOCKED_LOCATIONS parameter restrict or block access to these buckets, respectively, when stages that reference this integration are created or modified
- growthlop_role is the role associated to the service account used by GrowthLoop for querying snowflake
-
Create External Stage in Snowflake
- Run the following SQL Command in Snowflake
USE ROLE ACCOUNTADMIN; CREATE OR REPLACE STAGE flywheel_external_stage URL='s3://<bucket>exports/<org_id>/' STORAGE_INTEGRATION = flywheel_app_aws GRANT OWNERSHIP ON integration FLYWHEEL_APP_AWS to ROLE <growthloop_role>- NOTE: The Storage Integration must be created in the FLYWHEEL_SYSTEM Schema
- Where:
- iam_role is the Amazon Resource Name (ARN) of the IAM role you created above.
- bucket is the name of a S3 bucket that stores your data files (e.g. mybucket). The required STORAGE_ALLOWED_LOCATIONS parameter and optional STORAGE_BLOCKED_LOCATIONS parameter restrict or block access to these buckets, respectively, when stages that reference this integration are created or modified
- growthlop_role is the role associated to the service account used by GrowthLoop for querying snowflake
- org_id Please ask your GrowthLoop Solutions Architect to provide you with your specific org_id
-
Retrieve the AWS IAM User for your Snowflake Account
- To retrieve the ARN for the IAM user that was created automatically for your Snowflake account, use the DESCRIBE INTEGRATION.
DESC INTEGRATION GROWTHLOOP_APP_AWS;- Record the values for the following properties in the response:
- STORAGE_AWS_IAM_USER_ARN: The AWS IAM user created for your Snowflake account; for example, arn:aws:iam::123456789001:user/abc1-b-self1234. Snowflake provisions a single IAM user for your entire Snowflake account. All S3 storage integrations in your account use that IAM user.
- STORAGE_AWS_EXTERNAL_ID: The external ID that Snowflake uses to establish a trust relationship with AWS. If you didn’t specify an external ID (STORAGE_AWS_EXTERNAL_ID) when you created the storage integration, Snowflake generates an ID for you to use.
- You provide these values in the next section.
-
Grant the IAM User Permissions to Access Bucket Objects
- Log in to the AWS Management Console.
- Select IAM.
- From the left-hand navigation pane, select Roles.
- Select Role created above.
- Select Trust relationships tab.
- Select Edit Trust Policy
- Modify the policy document with the DESC STORAGE INTEGRATION output values you recorded.
{ "Version": "2012-10-17", "Statement": [ { "Sid": "", "Effect": "Allow", "Principal": { "AWS": "<snowflake_user_arn>" }, "Action": "sts:AssumeRole", "Condition": { "StringEquals": { "sts:ExternalId": "<snowflake_external_id>" } } } ] } - Where:
- snowflake_user_arn is the STORAGE_AWS_IAM_USER_ARN value you recorded.
- snowflake_external_id is the STORAGE_AWS_EXTERNAL_ID value you recorded.
- Select Update Policy to save changes.
-
Create an IAM user for GrowthLoop
- Log in to the AWS Management Console.
- Select IAM.
- From the left-hand navigation pane, select Users.
- Select Create User.
- Create user for GrowthLoop and assign IAM Role created above.
- Generate an access key and secret access key for the new user.
- Click save
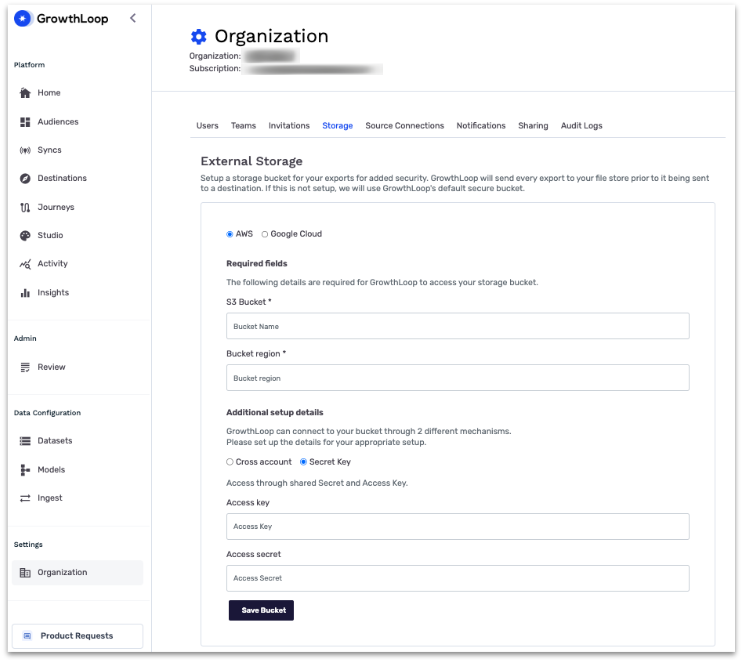
- You will use this access key and secret access key in Setup External Storage in GrowthLoop
-
Google Cloud Storage
To set GCS as your storage bucket follow these steps:
- Create a new GCS bucket in your account.
- Make sure to block public access
- Setup a TTL time of your choice to enhance security
- Create a GCP service account for a user with the following permissions:
| Permission | Details |
|---|---|
| storage.objects.list | List objects in a bucket |
| storage.objects.create | Create objects in a bucket |
| storage.objects.get | Get objects in a bucket |
| storage.buckets.get | Get metadata on a bucket |
- Create Credentials for your Service Account.
- In the Google Cloud console, go to Menu menu > IAM & Admin > Service Accounts.
- Select your service account.
- Click Keys > Add key > Create new key.
- Select JSON, then click Create. Your new public/private key pair is generated and downloaded to your machine as a new file. Save the downloaded JSON file as credentials.json in your working directory.
- You will use the
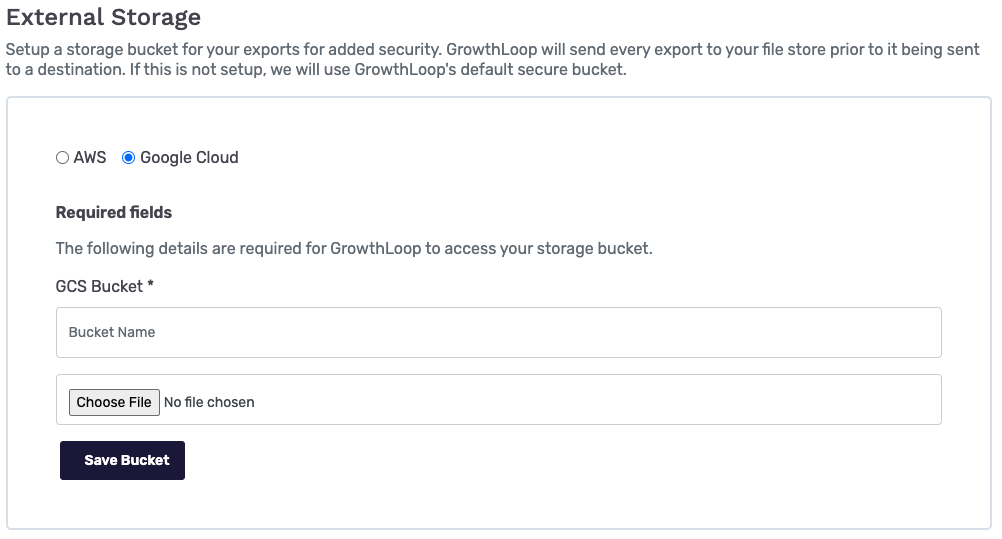
credentials.jsonfile in Setup External Storage in GrowthLoop
- You will use the
- Click Close.
Setup External Storage in GrowthLoop
Once you have your bucket ready along with the correct credentials, head over to Organization under Settings in the GrowthLoop application. Navigate to the Storage tab.


Setting up GCS Storage Bucket
Select your bucket platform and provide the necessary credentials then hit save. That's it! Our platform will now use your secure bucket for any staging of data.
If you experience any issues or have any questions, please reach out to us at [email protected], and we’ll be in touch shortly!
Updated 8 months ago