
Integrate with Salesforce Marketing Cloud
In this article, you'll learn how to integrate GrowthLoop with Salesforce Marketing Cloud
Introduction
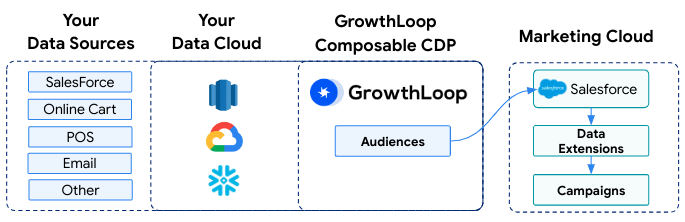
GrowthLoop supercharges Salesforce Marketing Cloud by unlocking the power of your entire modern data stack. This guide will walk you through how GrowthLoop integrates with Marketing Cloud and how to use them together to drive value for your team.
Marketing Cloud automates, personalizes, and optimizes marketing campaigns across multiple channels. However, the effectiveness of these campaigns often depends on the quality and scope of the data you provide, which is usually limited to data placed in Salesforce. Other valuable signals, such as transactions and events, are often siloed in disparate systems or buried in your Data Cloud, incurring additional costs. With Salesforce sunsetting their Audience Builder, GrowthLoop steps in as a great alternative for Marketing Cloud, integrating seamlessly to enable you to:
- Create highly defined audiences based on various data points in your Data Cloud.
- Export these segments directly to Marketing Cloud for targeted email campaigns.
- Orchestrate seamless omnichannel campaigns across email, SMS, push notifications, and social media.
- Measure performance across different customer segments used in Marketing Cloud from a central location.
GrowthLoop + Marketing Cloud Use Cases
Unlocking the power of your Data Cloud with a composable CDP like GrowthLoop offers numerous ways to enhance customer experiences and marketing results. Here are some popular examples:
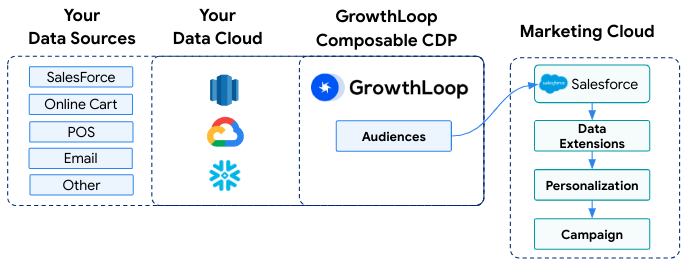
Send a Salesforce Marketing Cloud Email Campaign to a GrowthLoop Audience
GrowthLoop's Audience Builder was built as the easiest self-service way for marketers to create audiences for Salesforce Marketing Cloud campaigns. GrowthLoop enables marketing teams to build audiences directly on your data cloud data where they can utilize all of their organization’s data when defining audiences, not just CRM data. This includes data science predictions, internal data like coupon assignments, experiment labels, and more. Here's how to do it:
- Define Audiences: Use GrowthLoop to create highly defined audiences based on various data points in your Data Cloud.
- Export Audiences to Salesforce: Export these segments directly to Marketing Cloud as a Data Extension.
- Send Campaigns: Use Marketing Cloud to send targeted email campaigns to these segments.
Step-by-Step Breakdown
-
Creating an Audience in GrowthLoop:
- Navigate to Audiences:
- In the GrowthLoop app, on the left-hand side menu, click on "Audience".
- Create a New Audience:
- In the top right corner of the Central Audience Hub, click on "New Audience".
- Define Your Audience Criteria:
- Give your audience a descriptive name.
- Utilize the builder to define your audience criteria. You can add filters based on various data points from your connected data sources.
- Example: Target users who have made a purchase in the last 3 months and live in California.
- Refine Your Audience (Optional):
- Use the "Breakdown Report" section to see a breakdown of your audience based on specific attributes.
- Utilize "Comparisons" to compare your current audience with existing ones and potentially exclude overlapping segments.
- Navigate to Audiences:
-
Exporting an Audience to Marketing Cloud:
-
Save and Export:
- Once you're satisfied with your audience definition, click "Save" in the top right corner.
- After saving, an "Export Audience" button will appear. Click this button.
-
Choose Export Destination:
-
Select "Salesforce Marketing Cloud" as the export destination.
-
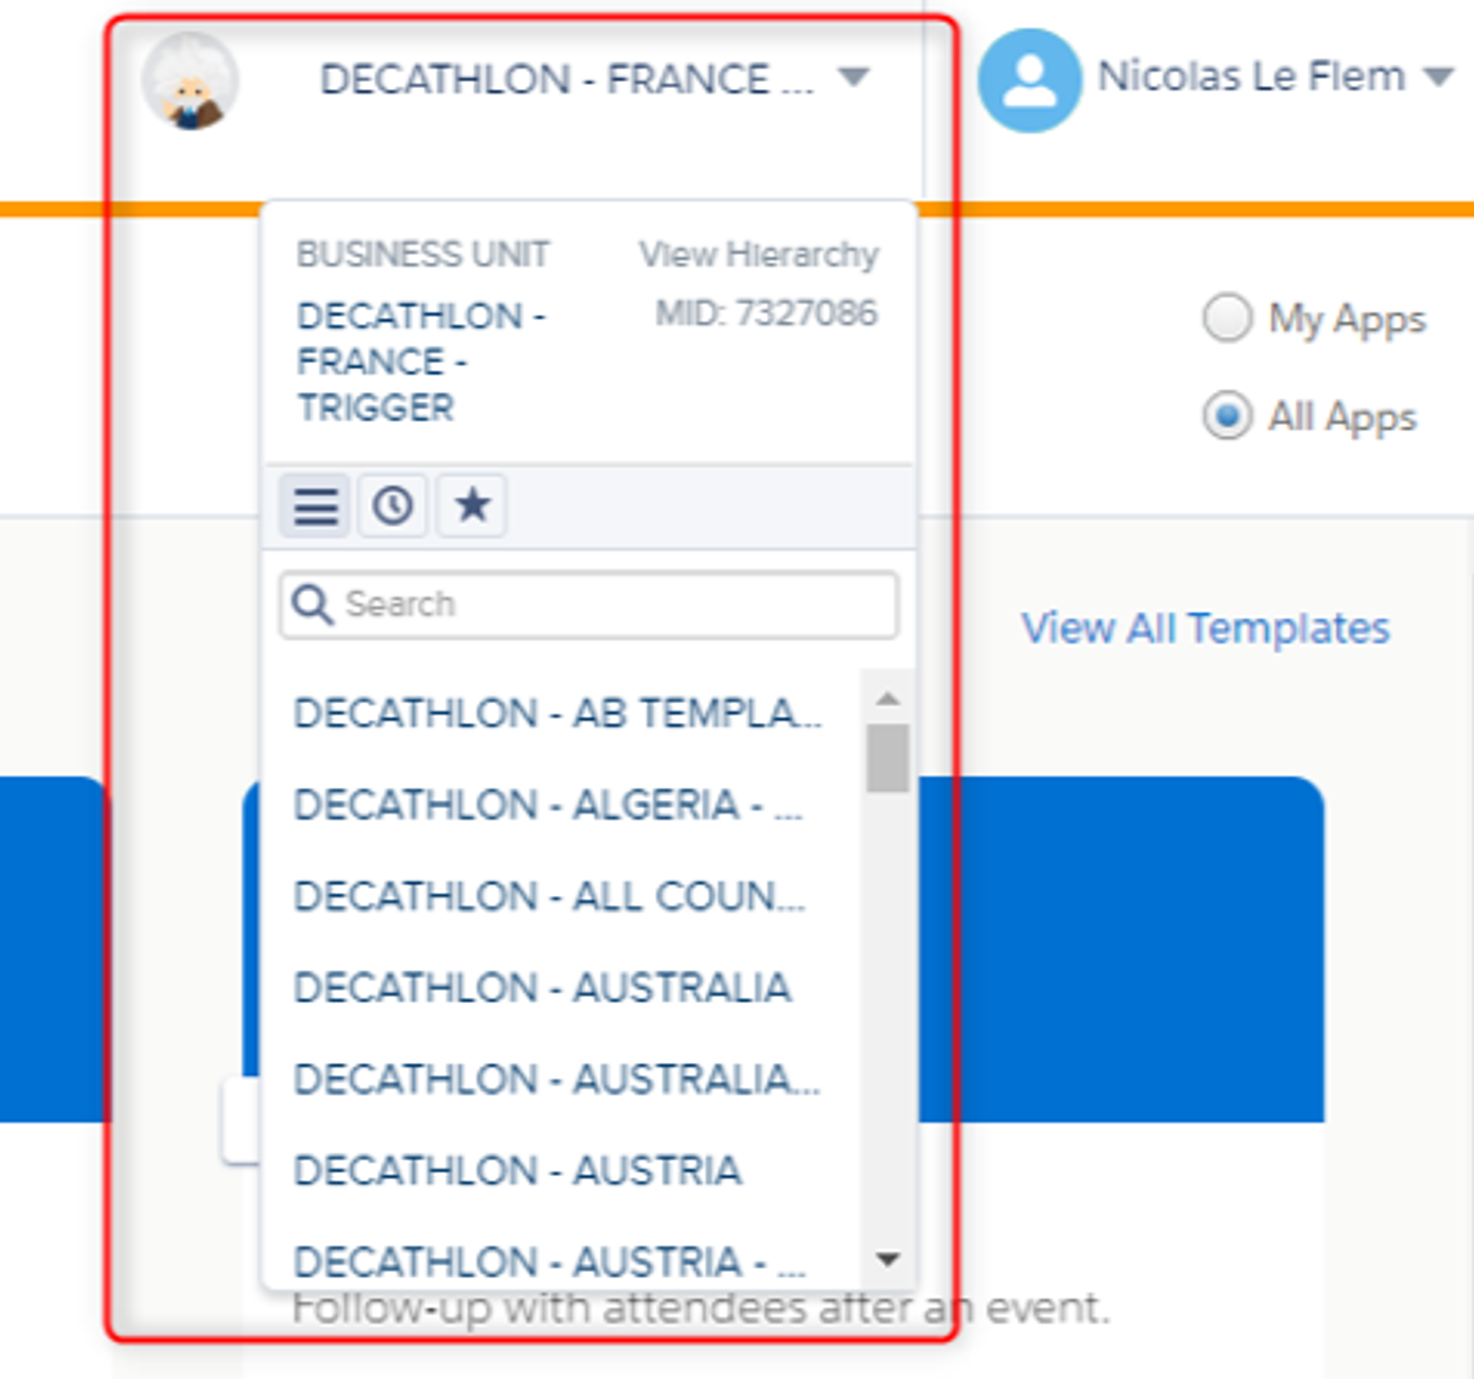
Specify the “Business Unit MID” you want to create the Data Extension under. To locate your Business Unit in Salesforce, navigate to the top right corner of the main welcome menu. A drop-down menu will appear with all business units and their MIDs.
-
Specify the specific “Data Folder Category ID” you want to create the Data Extension under. In Salesforce Marketing Cloud, it can be found by hovering over the target folder and copying the ID next to “categoryid”.

-
Select the additional fields you would like to include in the Data Extension under “Personalization Fields.”
-
-
Export Confirmation:
- Click "Export" to confirm and send your audience segment to Marketing Cloud. A Sendable Data Extension will be created using the name of the audience.
-
-
Sending a Email Campaign in Marketing Cloud:
- Navigate to Email Studio:
- Within Marketing Cloud, navigate to the "Email Studio" section.
- Create a New Email:
- Click on "New Email" to begin crafting your email campaign.
- Design Your Email Content:
- Use the drag-and-drop editor or HTML to design your email content, including images, text, and calls to action. To incorporate the additional fields you specified earlier as dynamic content for personalization in your emails, see the instructions here.
- Select Your Audience:
- In the "Recipients" section, choose "Data Extension" as the send source.
- Select the specific GrowthLoop audience segment you previously exported.
- Set Up Sending Options:
- Define the sender email address, subject line, and other sending options like tracking and reporting preferences.
- Schedule or Send:
- Schedule your email campaign for a later date or send it immediately. To turn your one-off emails into ongoing campaigns, define a recurring export frequency in GrowthLoop. Options include "Daily," "Weekly," or a custom schedule based on your needs. This ensures your targeted audience segment is continuously updated in Marketing Cloud, capturing new subscribers who meet your criteria.
- Navigate to Email Studio:
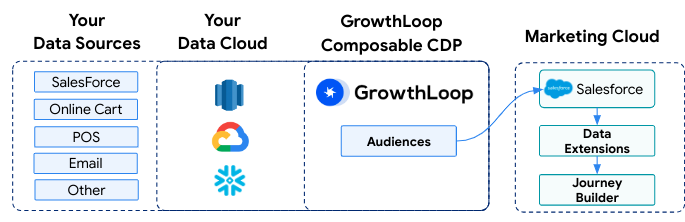
Run a Marketing Cloud Journey to a GrowthLoop Audience.
You can leverage GrowthLoop audiences to trigger when a user should enter a Salesforce Marketing Cloud Journey. This allows you to automate personalized journeys based on specific subscriber interactions or data points. Here's how to do it:
-
Create an Audience: Define your target audience in GrowthLoop using various data points from your Data Warehouse.
-
Export the Audience: Export this audience as a Data Extension to Marketing Cloud.
-
Set Up Journey: In Marketing Cloud, use the exported Data Extension as the entry source in Journey Builder.
-
Launch Journey: Launch the journey to engage with your audience through multiple channels, such as email campaigns, SMS, and push notifications.
Step-by-Step Breakdown
-
Creating an Audience in GrowthLoop:
- Create a GrowthLoop Audience.
-
Exporting an Audience to Marketing Cloud:
- Export the GrowthLoop Audience as a Data Extension to Marketing Cloud.
-
Create Marketing Cloud's Journey and target your GrowthLoop Audience:
- Open Journey Builder:
- Click on "Journey Builder" in the main navigation menu.
- Name and Configure Your Journey:
- Enter a name and optional description.
- Click "Next."
- Select Journey Type:
- Choose "Multi-Step Journey" (or your desired type).
- Click "Next."
- Select Entry Source:
- Select "Data Extension."
- Click "Next."
- Choose Data Extension:
- Click "Choose Data Extension."
- Select the specific GrowthLoop audience segment you previously exported.
- Click "Next."
- Configure Entry Settings:
- Set how contacts enter the journey. Marketing Cloud Journey Builder offers three entry options for contacts. Choose the option that aligns with your journey's goal and desired contact behavior:
- No Re-entry: Contacts enter once, ideal for linear journeys with a clear end (welcome series).
- Re-entry Anytime: Contacts can re-enter for ongoing engagement (weekly promotions).
- Scheduled Entry: Contacts enter at a specific pre-defined time (birthday greetings).
- Apply any filters as needed.
- Click "Done."
- Set how contacts enter the journey. Marketing Cloud Journey Builder offers three entry options for contacts. Choose the option that aligns with your journey's goal and desired contact behavior:
- Design Your Journey:
- Drag and drop activities (Email, SMS, Wait, etc.) onto the canvas.
- Configure each activity by clicking on it.
- Activate the Journey:
- Congratulations! You've successfully executed a Marketing Cloud Journey to a GrowthLoop audience. If you chose to set the audience as a recurring export in GrowthLoop, contacts will be added to the data extension and will continue to enter the journey on an ongoing basis.
- Open Journey Builder:
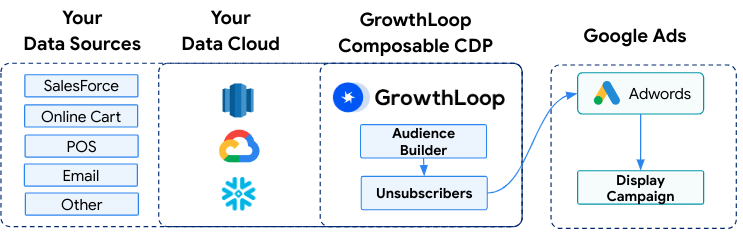
Create and utilize a GrowthLoop Audience consisting of recently unsubscribed contacts from Marketing Cloud campaigns on other suitable channels.
Opt-outs from email communications don't have to derail your marketing efforts. They simply signal a preference for other channels. With Growthloop, you gain access to over 100 destinations, such as Paid, SMS, Push, Direct Mail, and more. This ensures you can seamlessly engage customers through their preferred channels. Here's how:
-
GrowthLoop: Define an audience of recent unsubscribes using unsubscribe events and date filters.
-
Export: Send this unsubscribe audience to a paid media provider like Google Ads.
-
Launch campaign: Launch a display campaign on Google Ads, targeting unsubscribes to re-engage them.
Step-by-Step Breakdown
-
Creating an Audience in GrowthLoop:
- Create a GrowthLoop Audience with unsubscribe events and date filters.
-
Exporting an Audience to Marketing Cloud:
- Export the GrowthLoop Audience to Google Ads.
-
Launching a Display Campaign in Google Ads:
- Choose Your Audience:
- Select the custom audience you exported in the "Audiences" section of Google Ads.
- Start a Display Campaign:
- Click "Campaigns," then "Create campaign" and choose "Display" as the campaign type.
- Set Campaign Goals (Optional):
- Define goals like "Website traffic" or "Brand awareness" to optimize your campaign.
- Configure Settings:
- Under "Networks," choose "Display Network."
- Set locations, languages, budget, and bidding strategy.
- Target Your Custom Audience:
- In the "Targeting" tab, under "Audience targeting," browse and select your custom audience.
- Create Compelling Ads:
- Design responsive display ads with visuals, copy, and calls to action that resonate with your target audience.
- Launch and Monitor:
- Review your campaign settings and launch it.
- Track performance using Google Ads reporting tools and optimize based on data.
- Choose Your Audience:
Include Dynamic Content in Your Marketing Cloud Campaigns with User Attributes
Personalization is crucial for keeping your subscribers engaged. Utilize user attributes in your Data Cloud to craft emails that are highly relevant and captivating. By tailoring your content based on individual preferences and behaviors, you'll boost engagement and conversion rates. Here's how:
-
Define Your Audience in GrowthLoop: Build an audience using relevant subscriber data (e.g., purchase history, preferences).
-
Export the Audience: Send this targeted audience to Marketing Cloud as a Data Extension.
-
Craft Your Email in Marketing Cloud:
- Design your email using the drag-and-drop editor.
- Include personalization strings with double percent signs (e.g., %%FirstName%%).
-
Schedule or Send: Schedule your personalized email campaign or send it immediately.
Step-by-Step Breakdown
-
Creating an Audience in GrowthLoop:
- Create a GrowthLoop Audience with data for personalization, such as names, purchase history, website behavior, or preferences.
-
Exporting an Audience to Marketing Cloud:
- Export the GrowthLoop Audience as a Data Extension to Marketing Cloud.
-
Leverage Your User Record Data in Marketing Cloud Campaigns:
- Navigate to Email Studio:
- Within Marketing Cloud, locate the "Email Studio" section.
- Create a New Email:
- Click on "New Email" to begin crafting your campaign.
- Design Your Email Content:
- Use the drag-and-drop editor or HTML to design your email content, including images, text, and calls to action.
- Insert Personalization Strings:
- Surround the data extension field name with double percent signs (e.g., %%FirstName%%).
- Marketing Cloud will replace these with the corresponding data from each subscriber's record in the data extension.
- Schedule or Send:
- Once satisfied, schedule your personalized email campaign for a later date or send it immediately.
- Navigate to Email Studio:
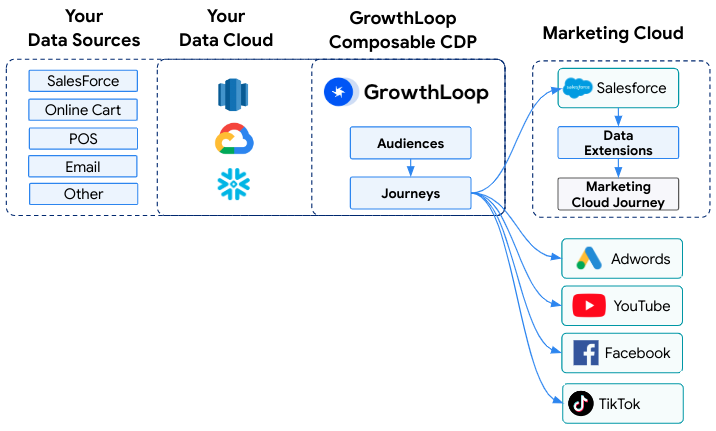
Send messages with Salesforce Marketing Cloud from GrowthLoop Journeys
GrowthLoop Journeys automates personalized customer journeys across channels from your Data Cloud. Using GrowthLoop's Journey Builder, marketers can orchestrate journeys across 100+ destinations alongside Marketing Cloud, access organizational data, use data science predictions, and gain visibility for analysis. Here's how to create a basic journey to export new customers for onboarding emails:
-
Create an Audience: Define your target audience in GrowthLoop using various data points, such as new customer acquisitions.
-
Build the Journey: In GrowthLoop, navigate to the Journeys section and create a new journey.
-
Configure and Export: Set the journey's entry audience to newly acquired customers, add a Destination Node, and configure it to export the audience to Marketing Cloud as a Data Extension.
-
Send Onboarding Emails: In Marketing Cloud's Email Studio, use the exported Data Extension as the audience for your onboarding email campaign. Design and send personalized welcome emails to engage your new customers.
Before we walk through how this setup works, there are several key benefits to having your journeys live in a Composable CDP.
Why use GrowthLoop Journeys to send messages alongside Marketing Cloud
- Unified Marketing Channels: Craft journeys across many different marketing channels, not just what Salesforce Marketing Cloud supports today. This lets you reach your audience in all the places they hang out online.
- Data-Driven Decisions: Use all your company's data, like surveys, purchase history, and even predictions from your data scientists, to personalize each step of your journey. This ensures your messages are relevant and timely.
- Enhanced Collaboration: Data teams can see exactly what journeys are running and how users interact with them. This allows for better collaboration between marketing and data teams for optimal campaign performance.
- Global Flexibility: Different regions can use their preferred marketing tools, while still leveraging the same journey builder in GrowthLoop. This provides flexibility without sacrificing consistency.
- Avoid Vendor Lock-in: You're not locked into a single marketing tool. GrowthLoop lets you easily switch marketing tools if needed, and you always own your data.
Step-by-Step Breakdown
-
Define Your Target Audience in GrowthLoop:
- Create a GrowthLoop Audience with new customers.
-
Build Your GrowthLoop Journey:
- Navigate to Journeys:
- In GrowthLoop, find the "Journeys" section.
- Create a New Journey:
- Select "New Journey" to start.
- Define the Journey:
- Set journey settings and save.
- Select an entry audience of new customers from the last seven days.
- Add a Destination Node for Marketing Cloud and configure export settings.
- Publish the Journey:
- Publish the journey to start immediately or schedule it.
- Navigate to Journeys:
-
Sending an Onboarding Email to the GrowthLoop Audience in Marketing Cloud:
- Navigate to Email Studio:
- In Marketing Cloud, go to "Email Studio."
- Create a New Email:
- Click on "New Email" to start your campaign.
- Design Your Email Content:
- Use the drag-and-drop editor or HTML to create your email content.
- Select Your Audience:
- Choose "Data Extension" as the send source.
- Select the GrowthLoop audience segment exported from the Journey.
- Set Up Sending Options:
- Define the sender email address, subject line, and other sending options like tracking and reporting preferences.
- Schedule or Send:
- Choose to either schedule your email campaign for a later date or send it immediately.
- Navigate to Email Studio:
Ingest Marketing Cloud Data to your Data Cloud & GrowthLoop
Understanding how customers engage with your marketing campaigns across different channels is essential for refining your strategy and enhancing targeting. That's why having all your performance data available in the Data Cloud for use in GrowthLoop audiences and journeys is invaluable. Now, with just a few clicks, you can seamlessly integrate your Salesforce Marketing Cloud data into your Data Cloud using the GrowthLoop Easy Button. Here’s how:

Step-by-Step Breakdown
-
Ingesting Marketing Cloud Interaction Data with Easy Button:
- In GrowthLoop, click on Ingest in left-hand menu.
- Select "Add Source" in the upper right.
- Select "Salesforce Marketing Cloud."
- Provide your credentials to access data in Marketing Cloud.
- GrowthLoop will verify these credentials will work to begin pulling data.
- Once setup, GrowthLoop will begin syncing data from Marketing Cloud to your Date Warehouse.
-
Using your Marketing Cloud Data in GrowthLoop Audiences:
- In GrowthLoop, click on "Datasets" in left-hand menu.
- Select "Add Dataset."
- Select the Marketing cloud table you'd like to utilize when building an audience.
- In Dataset Configuration, select the tables unique ID.
- Save Dataset.
- On "Datasets" page, select "Dataset Groups" tab.
- Select the "Dataset Group" you' would like to add your Marketing Cloud dataset to use in audience and journey building.
- Define join key between "Dataset" and the "Primary Dataset" in the Dataset Group.
- Click “Save.”
- Select "Audiences" in left-hand menu
- Select "New Audience"
- Select Dataset Group you just added Marketing Cloud Dataset to begin building your audience.
- You can now see you can leverage your Marketing Cloud Dataset in building your audience in GrowthLoop and export to any paid media, crm, or marketing channel. You can use your Marketing Cloud dataset to design audiences that:
- Haven't interacted with email in past 90 days
- Opened a specific email more than once.
- Interacted with a Content Card about a new product in your app.
How to use your Marketing Cloud Data in GrowthLoop Journeys- Follow Steps i-xiii in the section above.
- From GrowthLoop Home, select "Journeys" in left hand menu.
- Select "New Journey."
- Insert your Journey Settings and click “Save.”
- Drag a Criteria Node out onto the Journey Canvas.
- Select “Settings” on Criteria Node Menu.
- Add your Marketing Cloud dataset to the Criteria Node to use it as a criteria in your journey. For example, you can target:
- Users in the journey who opened the email sent in previous step
- Users in journey who haven't opened an email in 90 days, and send them to Facebook Ads.
GrowthLoop was built to integrate seamlessly with Salesforce Marketing Cloud. We have many customers leveraging GrowthLoop audiences, syncs and journeys to get the best out of Salesforce Marketing cloud for their teams. If you are curious to learn more contact [email protected].
Updated about 1 year ago