
Facebook (Meta) Conversions
Learn how to create Syncs for Facebook Conversions
In this guide, we will show you how to connect Facebook (Meta) Conversions as a destination and send conversion data to your Facebook Ads Manager. Let's get started!
Supported Objects
GrowthLoop enables syncing to the following Facebook (Meta) Conversions object:
| Object | Description | Sync Modes | Field Mappings (Required) | Field Mappings (Optional) |
|---|---|---|---|---|
Conversion | Sync and track conversion events to Facebook Ads Manager | Insert (adds new events) |
| See full list of parameters here |
| AMAPI | You can sync data to the facebook advanced measurement api. | Inserts (Adds new events) |
|
Prerequisites
- Have your Facebook Pixel handy. Follow the instructions on how to create one here.
Set up connection
- To begin, sign into the GrowthLoop Platform and navigate to the Destinations tab on the left sidebar. Click New Destination in the top right corner.
- In the Select Destination window that pops up, type Facebook Conversions into the search bar to find the Facebook Conversions. Click Add Meta / Facebook Conversions.
- Clicking Add Facebook Conversions will require you to select/insert the following information:
- Destination Name: This is a friendly name for the destination, used to refer to it within the app.
- Sync frequency: The default frequency for syncing audiences to a destination.
- Select Ad Account: The Ad Account you wish to send conversion data to.
- Facebook Pixel: This is a tracking code that measures the success of your ads. Use the same Pixel ID for both browser and server events if you have already set it up. Otherwise, follow the instructions on how to create one here.
- Advanced Measurement Table: If you want to use the advanced measurement API you need to set this optional field.
- Select Create. We will validate that we have all the proper permissions to load audience data to Facebook. If successful, you should now see the new
Facebook ConversionsDestination in your list of connected destinations!
Set up sync
- To route conversion signals to your Facebook Ads Manager, go to the Syncs tab on the left sidebar and click Create Sync in the top right corner.
- Clicking Create Sync will require you to select/insert the following information:
- Route Name:
- Name: A friendly name for the signal route.
- Sync frequency: The default frequency for syncing conversion signals to a destination. The options are: 15 minutes, 30 minutes, hourly, and daily.
- Update Rule: The default operation for syncing conversion signals to a destination. “Update only” changes existing data, “Insert only” inserts new data, and “Insert or update” is a hybrid action that adds new data if it's not already present or updates it if it is.
- Source:
- Dataset/Table: The table that holds your conversion data for each event. Usually, it's organized within an events table.
- Dataset Unique Field(s): The column that contains values that are distinct for each user in the table.
- Match Field: The column used to match and identify users from your source table in the destination system. Currently, Facebook Conversion API supports email, phone, External ID, Click ID, Browser ID, Subscription ID, Facebook Login ID, Lead ID, Client IP Address, and Client User Agent.
- Destination:
- Connection: The destination you will sync conversion data to. Please select Facebook Conversions.
- Object Type: The event that you want to track and send to Facebook for conversion tracking and analytics. Please select Conversions.
- Match Field: The column used to match and identify users from the destination system in your source table. Currently, Facebook Conversion API supports email, phone, External ID, Click ID, Browser ID, Subscription ID, Facebook Login ID, Lead ID, Client IP Address, and Client User Agent.
- Route Name:
- Once you finish selecting/inserting the required fields, click Save Sync.
- Now it’s time to add the field mappings to enable your signal route. The Facebook Conversions API require the following information about each conversion signal be mapped:
- Event Name: A distinct identifier for a specific customer action, which can be either a standard event like “Subscribe” or custom event. View the full list of standard events here.
- Event ID: A unique string chosen by the advertiser, required for event deduplication, matching with browser/app events.
- Event Time: Indicates when the event occurred. Facebook will automatically convert ISO 8601 timestamps to Unix.
- Action Source: Indicates where conversions took place. The values you can send in the field are as follows: email, website, app, phone_call, chat, physical_store, system_generated, and other.
- To map the fields, select the column that represents the Event Name from the drop-down under Source.
- Under the Destination section, select Event Name from the drop-down.
- Click Add Mapping to include a new Source -> Destination row underneath.
- Repeat steps 9 through 11 to map the remaining 3 required destination fields: Event ID, Event Time, and Action Source.
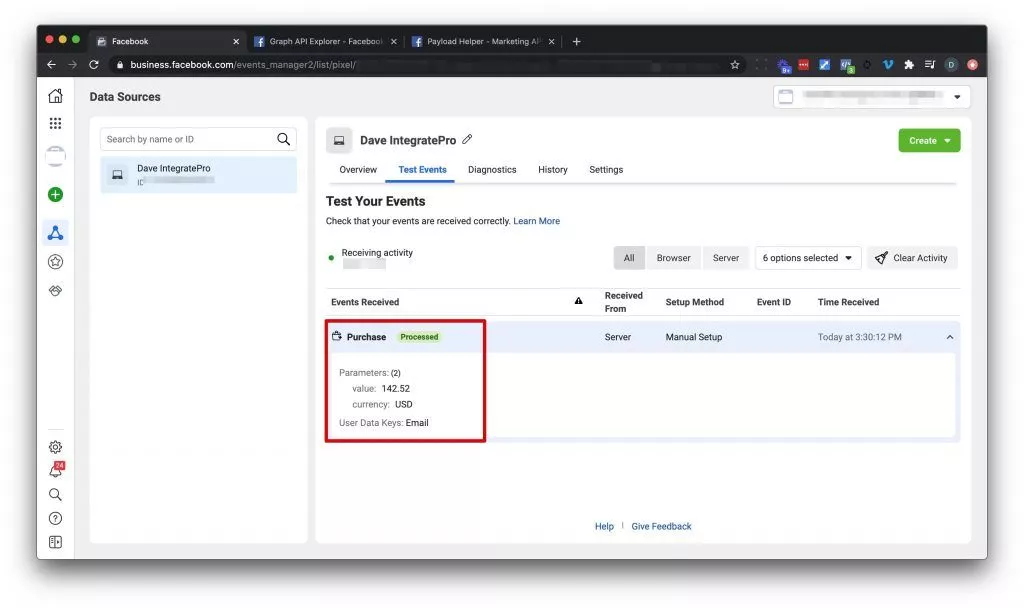
SuccessYou have successfully created a signal sync using the Facebook Conversions API to your Facebook Ads Manager!
To confirm that your conversion data has been received, log in to your Ads account and navigate to the Event Manager page.
Note:If you experience any issues when connecting to or creating syncs to Facebook (Meta) Conversions, please reach out to us at [email protected], and we’ll be in touch shortly to help resolve the matter!
Updated 5 months ago