
Google Ads Conversions
Learn how to create Syncs for Google Ads Conversions
In this guide, we'll walk you through syncing conversion events to Google Ads for a more comprehensive view of your campaign performance. Let's get started!
Supported Conversion Events
GrowthLoop enables syncing for the following Google Ads conversion events:
| Event | Description | Sync Modes | Field Mappings (Required) | Field Mappings (Optional) |
|---|---|---|---|---|
Click Conversions | Sync and track online actions taken after ad clicks for accurate campaign performance | Insert (adds new events) |
GCLID, GBRAID, or WBRAID:Unique identifier linking the conversion to the original ad click (only set one of these fields)
| See full list of parameters here |
Offline Click Conversions | Sync and track offline actions linked to ad clicks for complete attribution | Insert (adds new events) | Same fields as Click Conversions | See full list of parameters here |
Set up a Sync
- Click Syncs on the left sidebar.
- Then click Create Sync on the upper right hand-side.
- Next, configure your sync by filling out the following fields:
- Route Name
- Name: A friendly name for the sync.
- Sync Frequency: The default frequency for syncing data to a destination, such as "Daily" or "Hourly".
- Update Rule: The default operation for syncing conversion signals to a destination. Only the "Insert only" option is supported.
- Source
- Dataset/Table: The table that holds your conversion data for each event. Usually, it's organized within an events table.
- Dataset Unique Field(s): The column that contains values that are distinct for each event in the table.
- Match Field: The column used to match and identify users from your source table in the destination system.
GCLIDis recommended.
- Destination
- Connection: The destination you will sync conversion data to. Please select
Google Adwords. - Object Type: The event that you want to track and send to Google Ads for conversion tracking and analytics. Please select
Conversions. - Match Field: The field based on which to match source records with destination records.
GCLIDis recommended.
- Connection: The destination you will sync conversion data to. Please select
- Route Name
- Once you finish selecting/inserting the required fields, click Save Route.
- Now it’s time to add the field mappings to enable your signal route. Google Ads Conversion require the following information about each conversion signal be mapped:
- Conversion Action: The action that quantifies this conversion event.
- Conversion DateTime: The timestamp when this conversion was registered.
- To map the fields, select the column that represents the Conversion Action from the drop-down under Source.
- Under the Destination section, select Conversion Action from the drop-down.
- Repeat steps 5 & 6 to map the Conversion DateTime so you have the minimum required mappings (you can always do more than the minimum required of course), until the Update Route button is activated.
- When you are ready to update your signal route with the newly mapped fields, you’ll be prompted with the following 2 options:
Updates onlyorBack-fill. We recommend you go with the Updates Only option, especially if you’re setting up the signal for the first time.
NoteThe Back-fill option is when you are updating an existing Signal Route with newly mapped fields and you’d like all your already synced events to have those fields backfilled for them. This operation can be very expensive and time consuming on your underlying Data Warehouse, so please choose that option if you’re absolutely sure.
SuccessYou have successfully created a sync to Google Adwords!
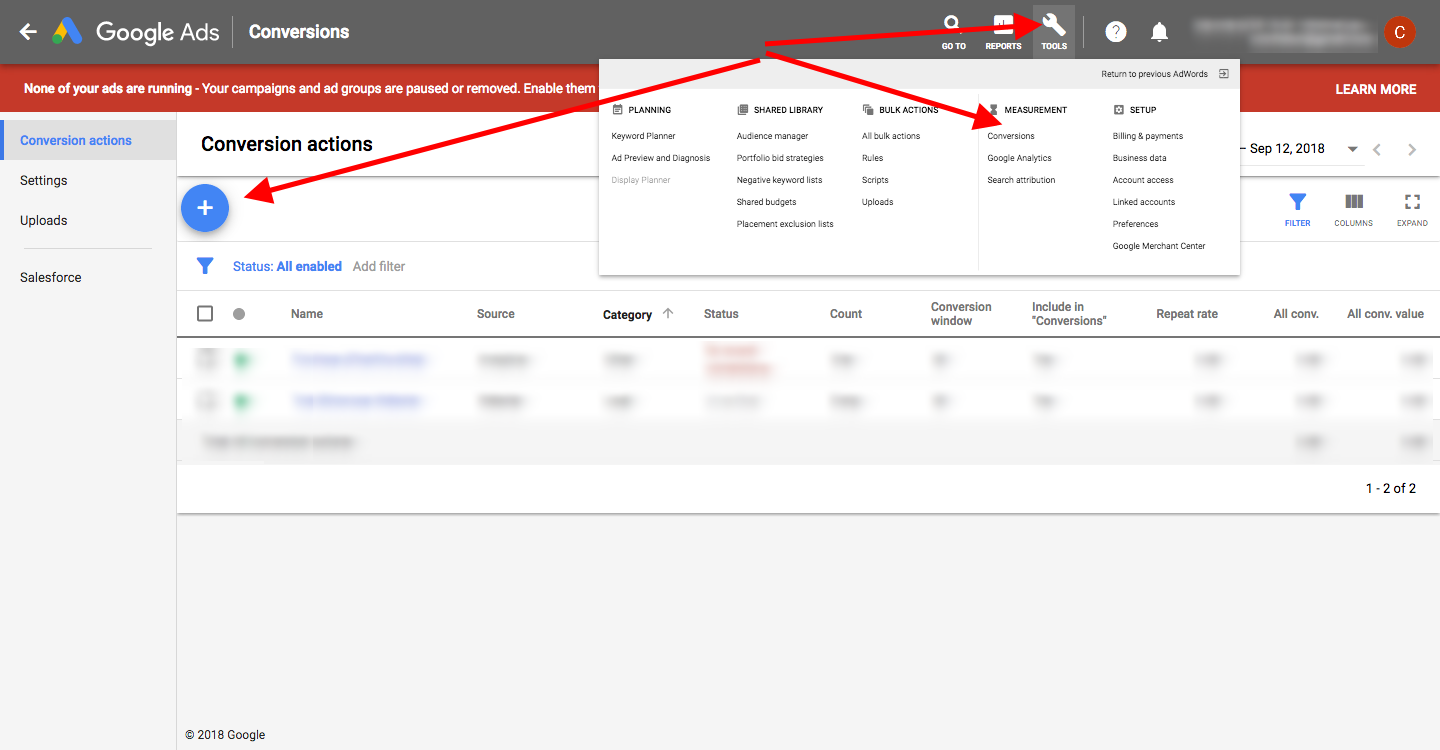
To confirm that your conversion data has been received, log in to your Ads account, select Tools, and then Conversions under the Measurement section.
NoteIf you experience any issues when connecting to or creating syncs to Google Ads Conversions, please reach out to us at [email protected], and we’ll be in touch shortly to help resolve the matter!
Updated about 1 year ago