
SendGrid
Learn how to connect and send audiences to SendGrid
In this article, we'll guide you through connecting SendGrid to GrowthLoop and exporting your audiences to the destination.
Prerequisites
- Make sure you have a SendGrid account. If not, you can create one here!
- Make sure your API Key is handy and it has full access or at least Marketing permissions. To create one,
- Log in to your account.
- Go to Settings from the left-hand navigation panel.
- Select API Keys.
- Click Create API Key.
- Choose Full Access (preferred) or Restricted Access with Marketing permissions.
- Click Create & View to generate your API Key.
- Copy your API Key and store it securely, as it won't be displayed again for security reasons.
Set up destination
-
Log into GrowthLoop and click the Destinations tab on the left sidebar.
-
Then click New Destinations on the upper right side.
-
Next, search for SendGrid in the destination modal and click Add SendGrid.
-
Enter the required information in the modal, then click Create.
- Destination Name: This is how the destination will be named and referred to in the app going forward.
- Sync Frequency: This indicates how frequently audiences will be synced to the destination.
- API Key: A unique string of characters that serves as an authentication credential for GrowthLoop to create, update, and manage contact lists. Follow the steps outlined above to learn how to create one.
Export to destination
-
Navigate to your list of audiences by clicking the Audiences tab on the left sidebar.
-
Choose an existing audience or create a new one. Need help creating? Click here to learn how!
-
Once created, click the Export button on the upper right side.
-
Search for SendGrid in the export modal and then click Add SendGrid.
-
Map one of the following fields under Configure Match Field Settings: Email, Phone Number, External ID, or Anonymous ID. SendGrid requires at least one user identifier for each export. Click Next.
-
Configure your export settings:
- Export Name: Automatically populated with your audience name for easy identification in the destination.
- Campaign Type: Choose between a one-time export or ongoing basis.
- List Status: Choose between new or existing.
- For new lists, it will use the audience name and add records to it.
- For existing lists, input the List ID to add records to it. To find it, navigate to a marketing list in SendGrid. The list ID is the last part of the URL.
- Export Schedule: Set the frequency, start date, end date, and specific days of the week.
-
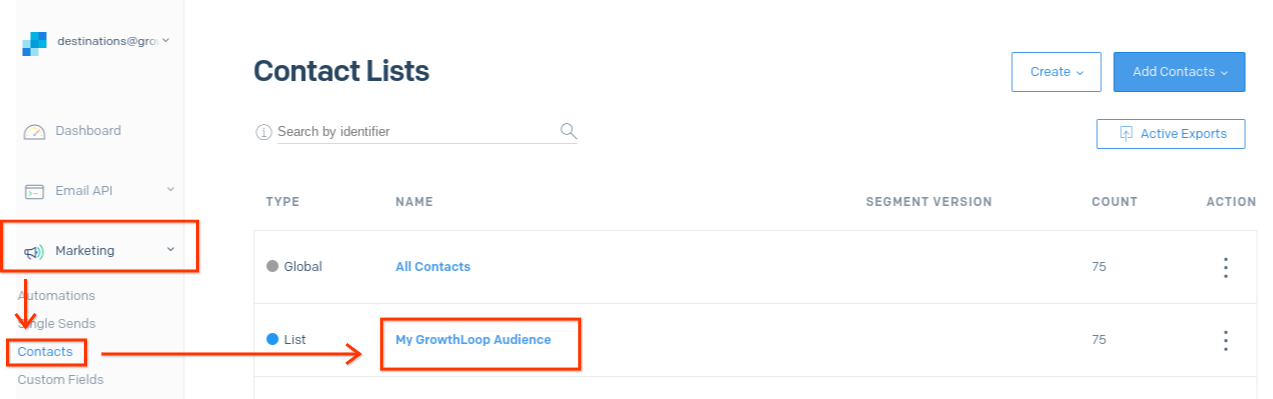
Lastly, click Export. Congrats on successfully exporting an audience to SendGrid! To view your audience, log in to your account, click the Marketing tab, and select Contacts.
NoteExperiencing any issues when connecting and/or exporting to SendGrid? Reach out to us at [email protected] and we’ll be in touch shortly to help resolve the matter!
Updated about 1 year ago