
Qualtrics
Learn how to connect and send audiences to Qualtrics
In this article, we'll guide you through connecting Qualtrics to GrowthLoop and exporting your audiences to the destination.
Qualtrics is an experience management platform that helps organizations collect, analyze, and act on customer, employee, product, and brand feedback through advanced surveys and analytics.
Prerequisites
NoteYour Qualtrics account must be whitelisted for
Early Access Programaccess. If it isn’t, please reach out to your Qualtrics rep to request access.
- Make sure you have a Qualtrics account. If you don't, fill out this form to connect with their sales team!
- Have your
Data Center ID,Directory ID*, andAPI Tokenready - you’ll need them to connect to your account. To find them, click on your profile icon in the top right, select Account Settings, and look under the User and API sections. - Confirm that your
API Tokenhas the following scopes:read:mailing_list_contacts: Access contacts in your mailing lists.write:mailing_list_contacts: Change or delete contacts in your mailing lists, or create new contacts in your mailing lists.write:contact_transactions: Access your contacts’ transactions in your directories.
Set up destination
-
Log into GrowthLoop and click the Destinations tab on the left sidebar.
-
Then click New Destinations on the upper right side.
-
Next, search for Qualtrics in the destination modal and click Add Qualtrics.
-
Enter the required information in the modal, then click Create.
Destination Name: Enter the name you want to give the destination.Sync Frequency: Select a default export frequency to the destination.Data Center ID: Input your Data Center ID, which can be found in Account Settings under the User section.Directory ID: Input your Directory ID, which can be found in Account Settings under the User section.API Token: Input your API Token, which can be found in Account Settings under the API section.
Export to destination
- Navigate to your list of audiences by clicking the Audiences tab on the left sidebar.
- Choose an existing audience or create a new one. Need help creating? Click here to learn how!
- Once created, click the Export button on the upper right side.
- Search for Qualtrics in the export modal and then click Add Qualtrics.
- Then, map the field in your table that contains the user’s email address to the
Emailuser identifier field in Configure Match Field Settings. This step is required to proceed. Once mapped, you can also optionally includeFirst Name,Last Name,External Reference ID,Unsubscribed,Phone, andLanguagefields. - Configure your export settings:
Export Name: Automatically populated with your audience name for easy identification in the destination.Campaign Type: Choose between One Time to export the audience once or Ongoing to continuously export new audience members as they qualify.Export Inclusion Criteria: Choose between All audience members to export the full audience or Newly added audience members to export only those who have been added since the last export.Add Contacts to: Choose to add contacts to a Mailing List for sending targeted surveys. In the future, support for adding contacts to XM Directory will be available.Mailing List Status: Choose between New to create a new contact list using the audience name, or Existing to add users to an existing segment by providing a Mailing List ID.Export Schedule: Configure the Frequency, Start Date, End Date, and specific Days of the Week (only for Ongoing exports).Additional Fields: Add extra fields to your export for personalization, with the option to alias the output for further customization.
- Finally, click Export to send the audience to Qualtrics!
SuccessYou have successfully exported the audience!
Find your audience
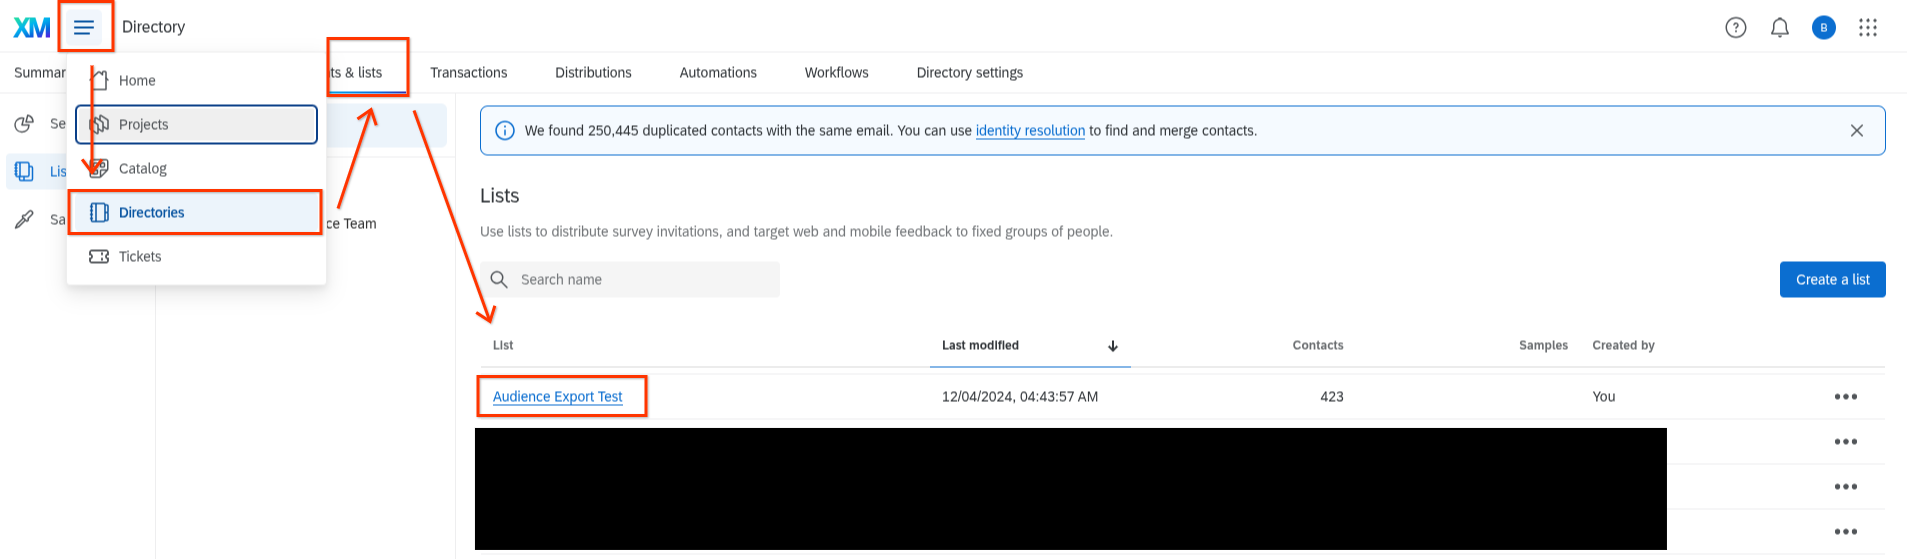
To view your audience, log in to Qualtrics, click Directories in the left-hand sidebar, navigate to the Segments & Lists tab, and find your audience name in the table!
NoteExperiencing any issues when connecting and/or exporting to Qualtrics? Reach out to us at [email protected] and we’ll be in touch shortly to help resolve the matter!
Updated 12 months ago