
Export Templates
Learn how to create, manage, and use export templates to streamline audience exports to multiple destinations.
Export Templates allow you to save and reuse export configurations, making it faster and easier to export audiences to your destinations. By pre-configuring settings like match fields, personalization fields, and privacy settings, you can streamline the export process and maintain consistency across multiple exports.
What are Export Templates?
Export Templates store all the configuration details for an export except the export type (one-time vs. ongoing) and frequency. This includes:
- Match fields (user identifiers like email, phone number, or device ID)
- Personalization fields (additional fields to send to the destination)
- Privacy and consent settings
- Platform-specific settings (varies by destination)
- Export field mappings
When you use a template, these settings are automatically populated, and you only need to specify whether the export is one-time or ongoing and set the frequency.
Important: Export Templates are linked to a specific dataset group and destination. A template can only be used when exporting audiences in the dataset group to the same destination it was created for. For example, if you create a template for "Customer Audience A" in dataset group "Second Group", exporting to "My Facebook Ads destination", that template will only appear when exporting any audience in "Second Group" dataset group to "My Facebook Ads destination".
Creating an Export Template
-
Navigate to an audience and click
Exportfrom the dropdown menu. -
In the
Export Audiencemodal, you'll see destination cards with two buttons:New ExportandUse Template. -
Click the
Use Templatebutton on the destination card you want to create a template for.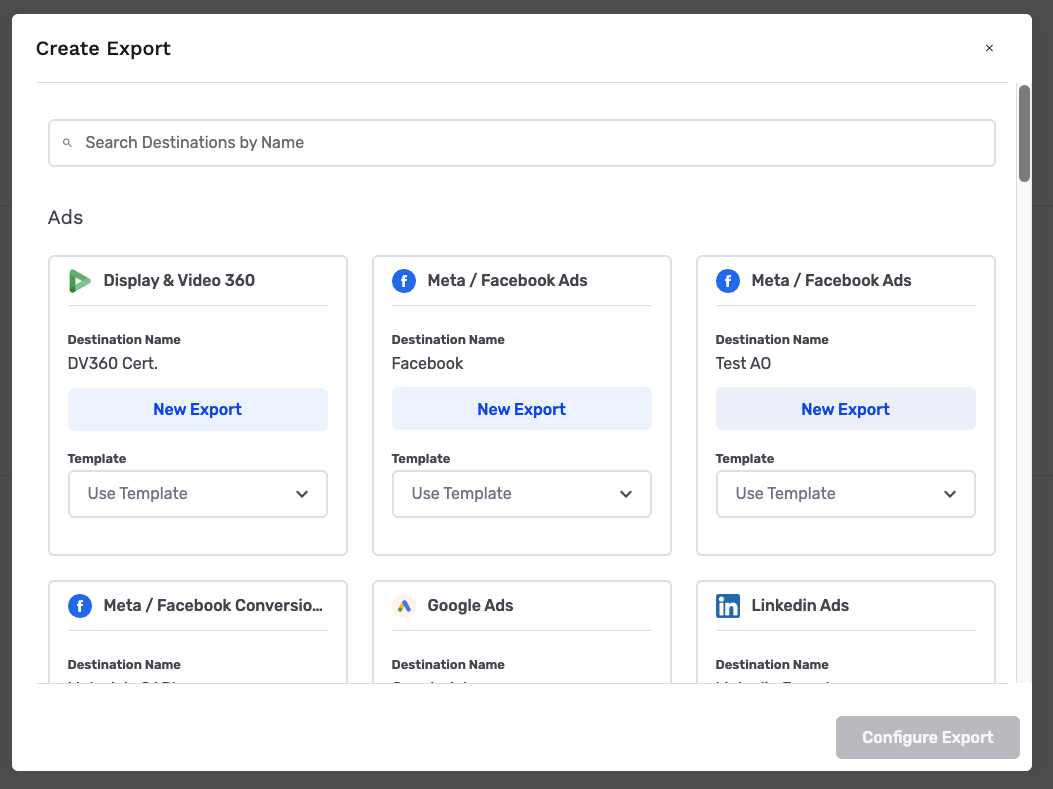
-
In the dropdown that appears, click the
Create Templatebutton at the top of the list.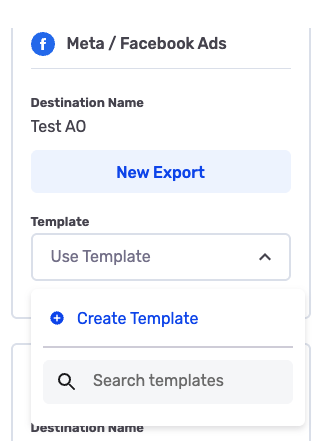
-
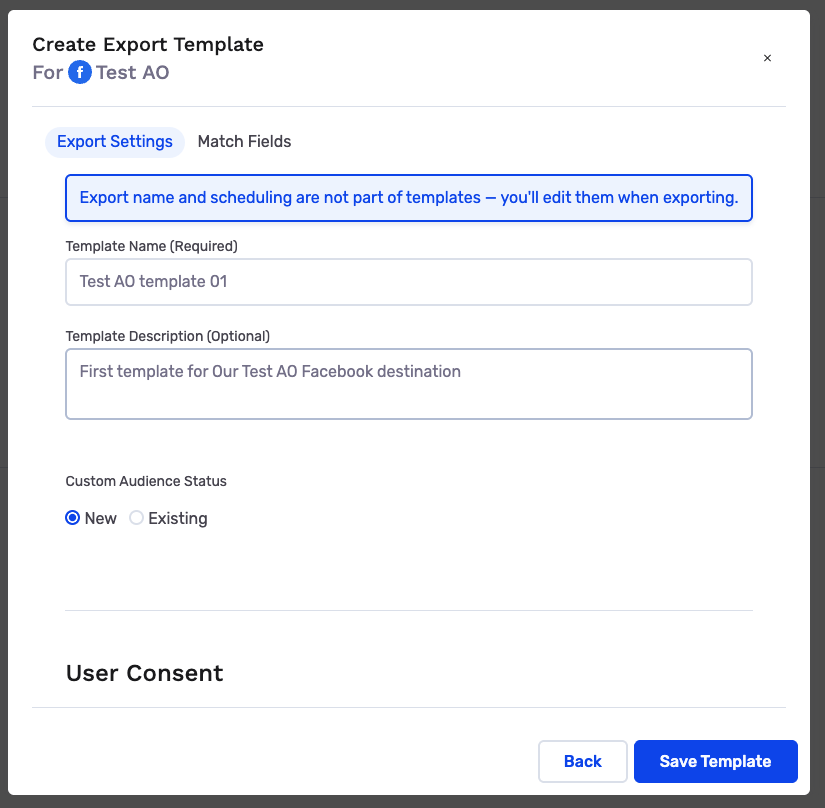
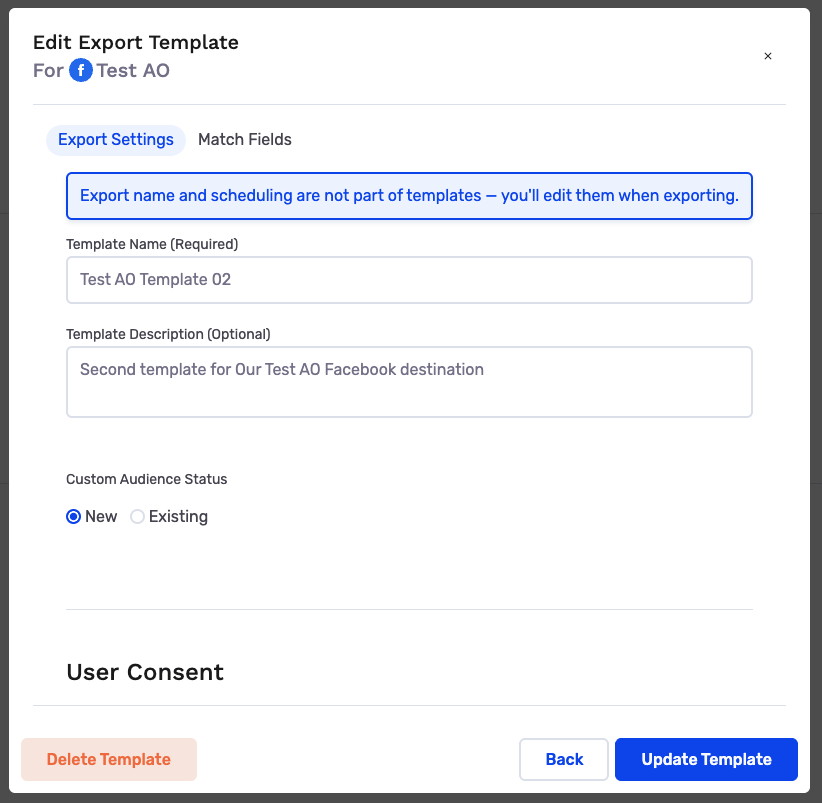
The modal updates to show the template creation form with the header "Create Export Template" and subheader "For [DESTINATION NAME]".
-
A banner message appears: "Export name and scheduling are not part of templates – you'll edit them when exporting."
-
Fill in the template configuration:
-
Template Name: A descriptive name for your template (e.g., "Summer Sale" or "Promo Audience").
-
Template Description (optional): Additional details about when or how to use this template.
-
Export Settings: Configure destination-specific settings.
-
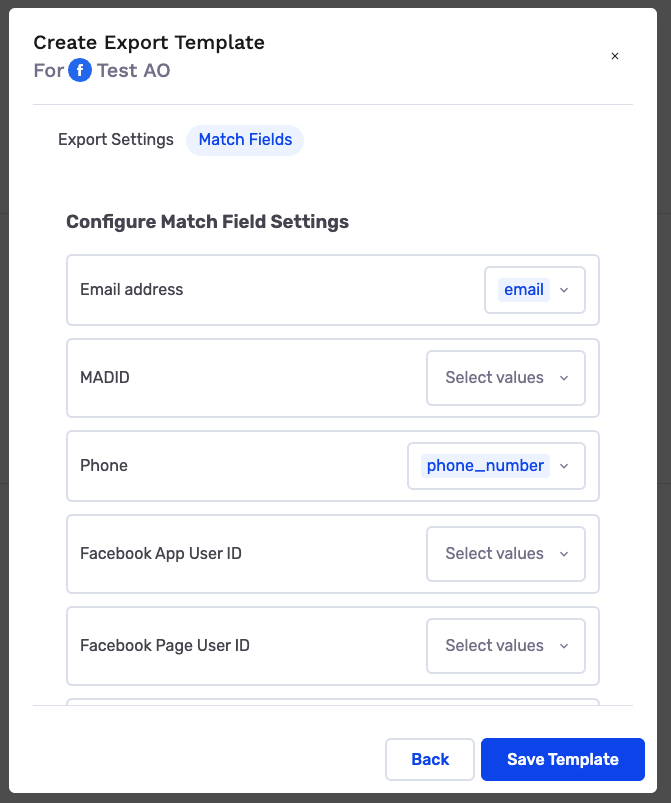
Match Fields: Select the user identifiers (such as email, phone number, or device ID) to match records in the destination.
-
User Consent (if applicable): Choose the field representing user consent, which must have boolean values.
-
Additional Fields (if supported by destination): Select any personalization fields to include.
-
-
Click
Save Templateto create the template. -
You'll return to the
Export Audiencemodal with theUse Templatedropdown automatically open, showing your newly created template at the top of the list with "Never used" metadata.
NoteWhen creating a template, you do not need to specify the export type (one-time vs. ongoing) or frequency. These settings are configured when you use the template to export an audience. The information shown depends on the selected destination - for example, platforms like Snapchat and other paid media destinations don't support Additional Fields.
Viewing and Editing Templates
All template management happens within the export modal during the export process. There is no separate settings page for templates.
Viewing a Template
- Navigate to an audience and click
Exportfrom the dropdown menu. - In the
Export Audiencemodal, click theUse Templatebutton on a destination card. - In the dropdown that appears, you'll see a list of previously created templates for that destination.
- Hover over the eye icon next to any template name to see the "View" tooltip.
- Click the eye icon to view the template details.
- The modal updates to show "Edit Export Template" with all the template configuration prefilled:
- Template Name
- Template Description
- Match Fields
- User Consent
- Additional Fields and other platform-specific export settings (if supported by the destination)
NoteThe information shown depends on the selected destination. For example, platforms like Snapchat and other paid media destinations don't support Additional Fields, so they won't appear - but they are available for most other destinations.
Editing a Template
- After viewing a template (following the steps above), you'll see the template details in edit mode.
- Update any of the following:
- Template Name
- Template Description
- Match Fields
- User Consent
- Additional Fields and other platform-specific export settings (if supported by the destination)
- Three buttons appear at the bottom (from left to right):
Delete Template: Deletes the template and returns you to theExport Audiencemodal with theUse Templatedropdown open.Back: Returns to theExport Audiencemodal with theUse Templatedropdown open without saving changes.Update Template: Saves your changes and returns to theExport Audiencemodal with the template applied in the destination card.
NoteChanges to a template will not affect existing exports that were created using the template. The template is used only at the time of export creation.
Deleting a Template
- View the template you want to delete (following the viewing steps above).
- Click the
Delete Templatebutton at the bottom left of the modal. - The template is deleted and you'll return to the
Export Audiencemodal with theUse Templatedropdown open.
Using Export Templates
Step 1: Select the templates
- Navigate to the audience you want to export and click
Export. - In the
Export Audiencemodal, click theUse Templatebutton on your desired destination card. - Select a template from the dropdown list.
- The destination card UI updates (checkbox selected, blue stroke, template label shown).
- The
Configure Exportbutton at the bottom-right becomes active and shows "Configure 1 Export". - You can repeat the process, selecting other templates for other destinations. The
Configure Exportbutton at the bottom-right will update to show "Configure X Exports" (where X is the number of selected destinations).
NoteIf you prefer the traditional export flow without using templates, click the
New Exportbutton instead ofUse Templateto manually configure all settings.
Step 2: Configure Export Details
-
Once you selected all the templates, click the
Configure X Exportsbutton at the bottom-right -
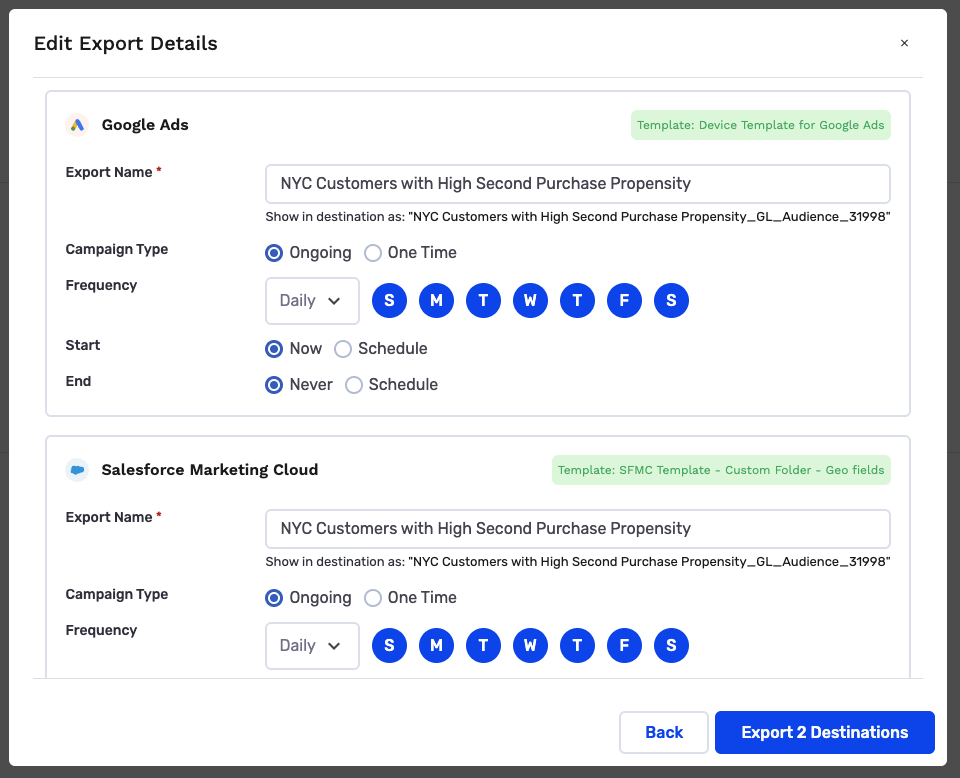
The modal updates with the header "Edit Export Details".
-
You'll see tiles for each destination/template combination, displaying:
- Destination name (e.g., "Snapchat - Marketing")
- Selected template label (e.g., "Template: Promo Audience")
- Export Name: Editable field (defaults to audience name)
- Campaign Type: Editable - select "Ongoing" or "One Time"
- Frequency: Editable - set the frequency if ongoing
- Start Date: Editable timing field
- End Date: Editable timing field
-
Edit these fields as needed for your export.
NoteExport Name, Campaign Type, Frequency, Start, and End are editable. Match fields, personalization fields, and other settings come from the selected templates and are not shown or editable at this stage.
Step 4: Execute the Export
- Review your configurations for all destinations.
- Click the
Export X Destinationsbutton at the bottom (where X is the number of destinations). - The export is triggered for all selected destinations.
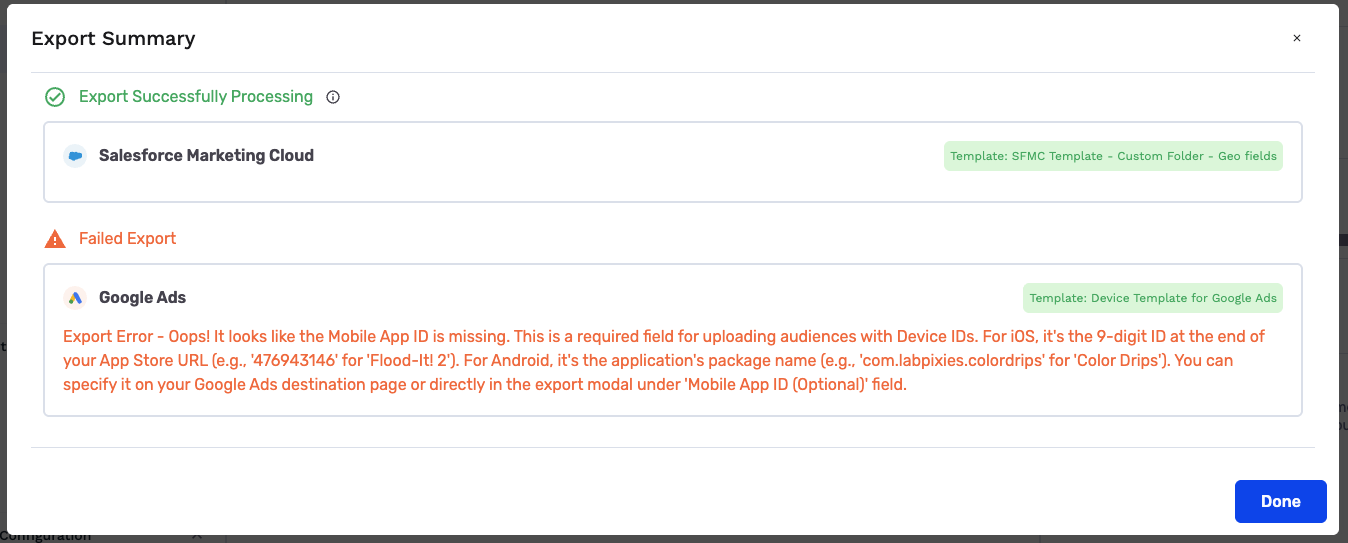
- After the export process completes, you'll see the results:
- If all exports succeed: A general success message is displayed confirming that all destinations were exported successfully.
- If any exports fail: You'll see individual tiles for each destination showing:
-
The destination name
-
Export status (success or failure)
-
The reason for failure (if applicable)
-
NoteThe count in the "Export X Destinations" button is dynamic and updates based on the number of templates selected for export.
Updated 5 months ago