
Google Ads: Campaign Location Targeting
Learn how to set up Syncs that keep your Google Ads campaign location targeting accurate and up to date.
In this guide, we'll show you how to sync campaign-level location targeting settings to Google Ads to keep your targeting precise and current.
Supported campaign settings
GrowthLoop enables syncing the following Google Ads campaign-level settings:
| Setting / Criterion | Description | Sync Modes | Field Mappings (Required) | Field Mappings (Optional) |
|---|---|---|---|---|
Location Targeting (Criteria) | Add or remove geographic targets such as countries, regions, cities, or postal codes at the campaign level. | Insert only - All syncs run in Insert mode, but will add or remove existing targets based on the value of the mapped Action field. |
|
|
Important
Google Ads does not allow more than 500 radius-based location targets per campaign.
Set up connection
-
To begin, sign into the GrowthLoop Platform and navigate to the Destinations tab on the left sidebar. Click New Destination in the top right corner.
-
In the Select Destination window that appears, just type Google Ads into the search bar. Then, click Add Google Ads.
-
In the window, please enter the following information to set up the connection to the destination.
- Destination Name: This is how the destination will be named and referred to in the app going forward.
- Sync Frequency: Select how often audiences are exported to Google Ads.
- Select Ad Account: Choose the account containing the campaign(s) you would like to sync location targeting to.
- Campaign ID: Enter the unique identifier of the Google Ads campaign where the location target will be added or removed. You can find it in the URL when viewing a campaign in Google Ads (e.g., https://ads.google.com/...campaignId=12345678901, where 12345678901 is the Campaign ID). If different rows need different Campaign IDs, you can map a column from your table on the Sync Field Mapping page.
- Radius: Enter how far out you want Google to target around each location (e.g., 1, 5, 10). This radius will be applied to all rows in the sync. If different rows need different radius values, map a radius column from your source table on the Sync Field Mapping page.
- Radius Unit: Choose whether the radius is measured in miles or kilometers. Google uses this together with your radius to determine the size of the proximity area around each location you map later. This unit will be applied to all rows in the sync. If different rows need different units, map a radius-unit column from your source table on the Sync Field Mapping page.
Note
Sync frequency is separate and will be set later in the Set up a Sync section.
- Click Create once all information is entered. The new Google Ads destination will then appear in your connected destinations list.
Set up sync
- Click Syncs on the left sidebar.
- Then click Create Sync on the upper right hand-side.
- Next, configure your sync by filling out the following fields:
-
Route Name- Name: A friendly name for the sync.
-
Source- Dataset/Table: The table that contains the location data you want to sync to your Google Ads campaigns. This may include latitude/longitude, radius values, or address information.
- Dataset Unique Field(s): The column that uniquely identifies each location record in your table. This is automatically selected based on the table’s defined unique key.
- Match Field: The column used to determine how each row should be applied during the sync. For campaign-level targeting, this is typically a campaign identifier (e.g., campaign_id) that maps each location to the correct Google Ads campaign. If you’ve already specified the campaign in the destination configuration, please map one of the required fields here.
Note
You will still need to map this field again on the next page
-
Destination- Connection: The destination you will sync location data to. Please select Google Adwords.
- Object Type: The campaign object you want to update in Google Ads. Please select Campaign.
- Match Field: The field used to match your source records with the correct Google Ads campaign.
This is typically the Campaign ID you mapped in the Source step, but you may map any of the required fields here if the Campaign ID was already specified in the destination connection.
-
Sync Settings- Sync Frequency: The default frequency for syncing data to a destination, such as "Daily" or "Hourly".
- Update Rule: The default operation for syncing data to your campaign(s). Only the "Insert only" option is supported.
-
- Once you finish selecting/inserting the required fields, click Save Route.
Configure field mappings
- Now it’s time to add the field mappings to enable your Sync. Google Ads campaign-level location targeting requires the following fields to be mapped:
- Campaign ID
- Latitude (in micro degrees)
- Longitude (in micro degrees)
- Radius
- Radius Units
- Street Address
- City
- Province Code
- Postal Code
- Country Code
Note
If you already specified the Campaign ID, Radius, and Radius Unit during the Connection setup, you don't need to map them.
- Under the Source section, map each of the required fields (e.g., Latitude, Longitude, Radius, Radius Unit, Address components, and Campaign ID) to the corresponding columns in your dataset.
- Under the Destination section, select the matching Google Ads fields for each of the required mappings.
Note
If you would like the option to remove location targets automatically from campaigns, be sure to map the Action field as well.
- Once all required fields are mapped, the Update Route button will become active.
- After clicking Update Route, you’ll be prompted to choose between two options: Updates only or Back-fill. We recommend you go with the former option, especially if you’re setting up the Sync for the first time.
Note
The Back-fill option is when you are updating an existing Sync with newly mapped fields and you’d like all your already synced events to have those fields backfilled for them. This operation can be very expensive and time consuming on your underlying Data Warehouse, so please choose that option if you’re absolutely sure.
- Finally, click the toggle at the top left of the page (next to the Sync name) to enable the Sync. You’ll be asked to confirm - click Enable to activate it.
Success
You have successfully created a sync to a Google Ads Campaign!
Find your sync
To confirm that your location data has been correctly applied to your campaign(s), follow these steps:
- Log in to your Google Ads account
- In the left-hand navigation, click Campaigns
- Select the campaign you are syncing location data to
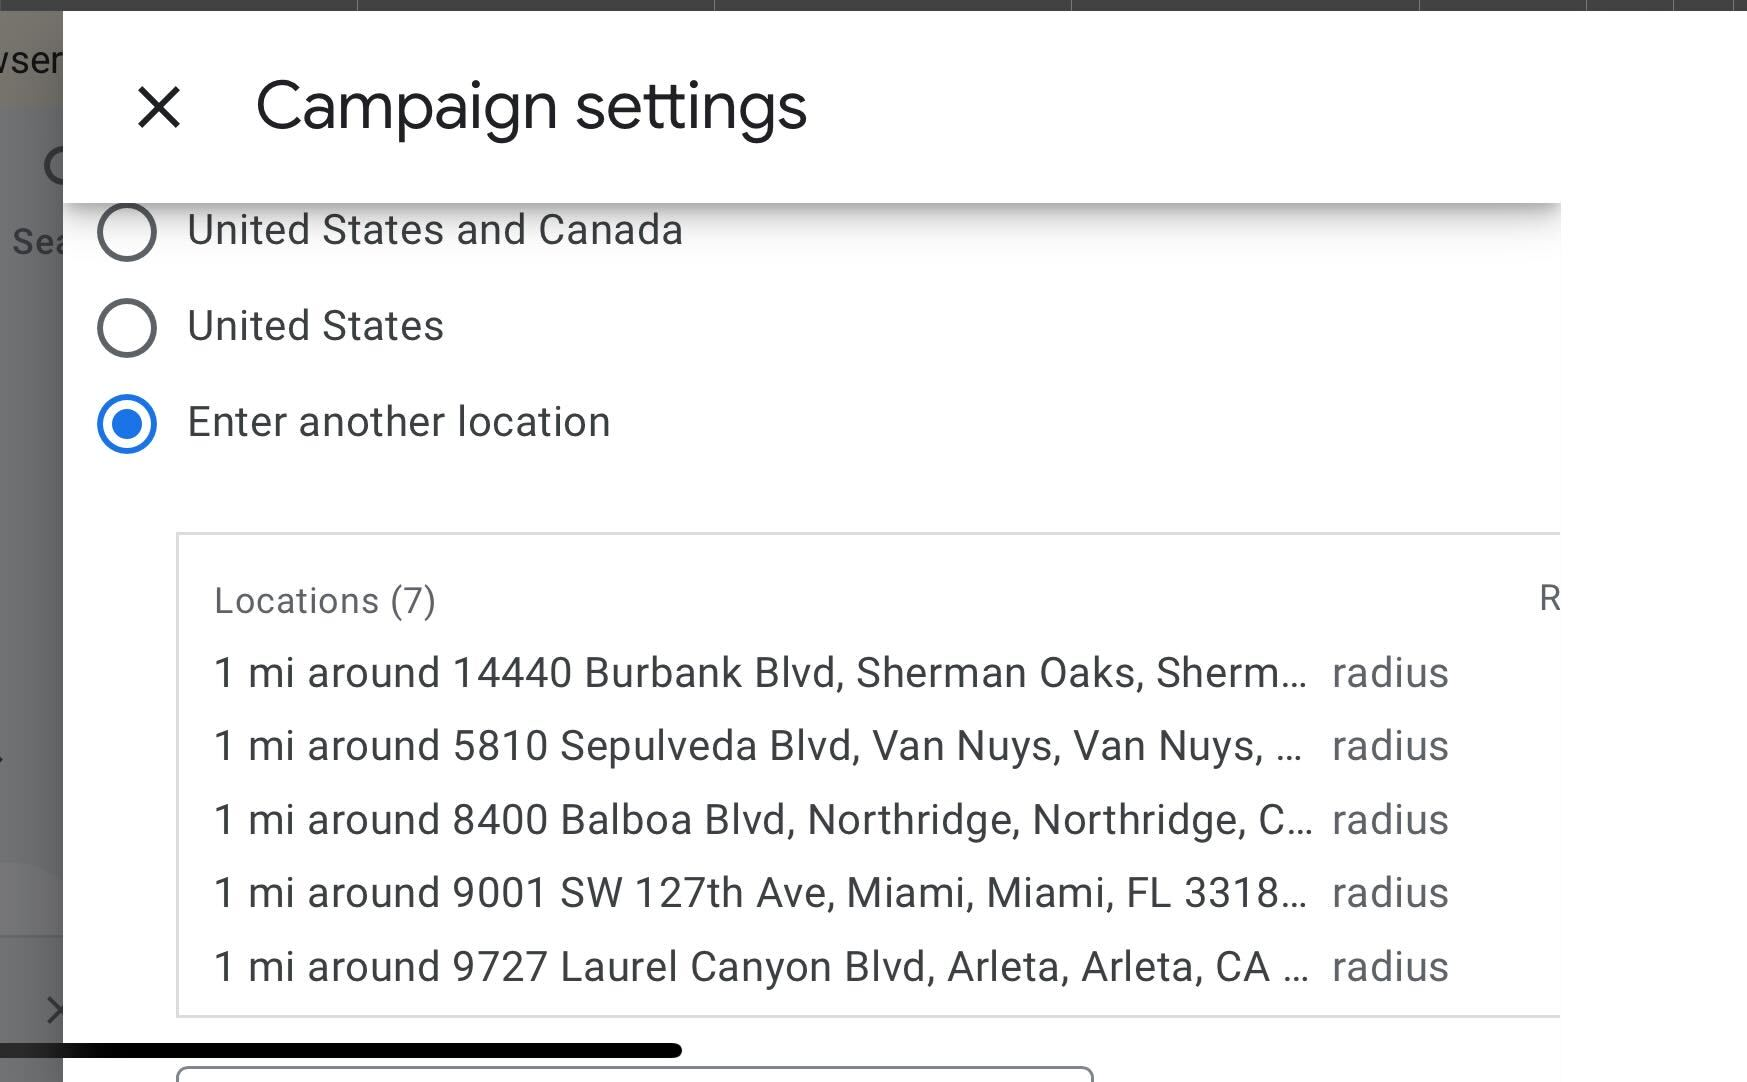
- In the campaign’s left menu, click Settings
- Scroll down to the Locations section under Other settings
Here, you’ll see the list of locations that GrowthLoop added or removed based on your Sync configuration.
NoteIf you experience any issues when connecting to or creating syncs to Google Ads: Campaign Location Targeting, please reach out to us at [email protected], and we’ll be in touch shortly to help resolve the matter!
Updated 8 months ago